Pular para o conteúdo principal

Notificações Push no iOS

Aqui você aprenderá como configurar todas as funções do SDK do Group Link para suportar Notificações Push em seu aplicativo.

Passo 1 - Ativar a Entitlement de Notificação Push

Na aba Signing & Capabilities das configurações do seu alvo, clique no botão “+ Capability” e adicione a capacidade Push Notification.

Passo 1.1

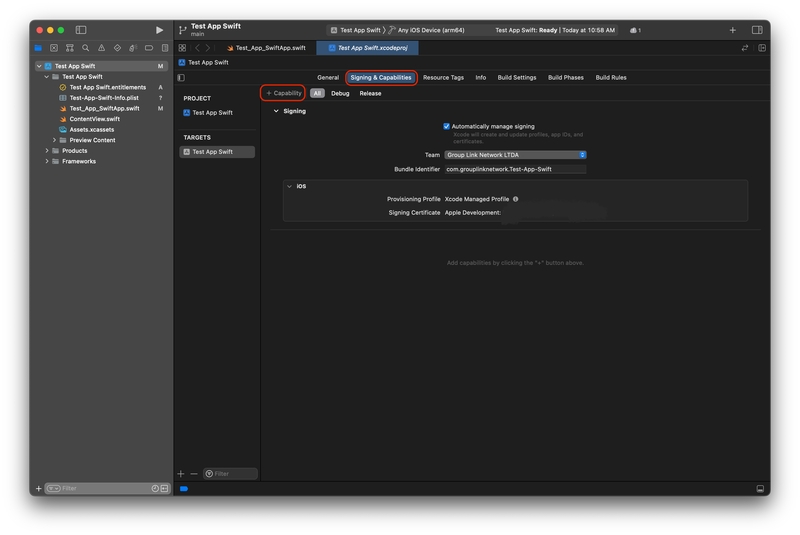
Página de Signing & Capabilities

Passo 1.2

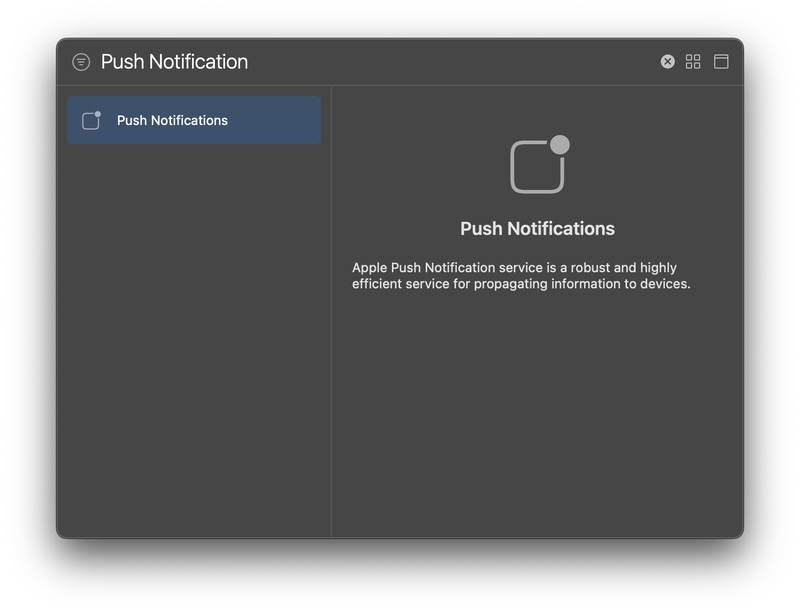
Tela de Capacidade de Notificação Push

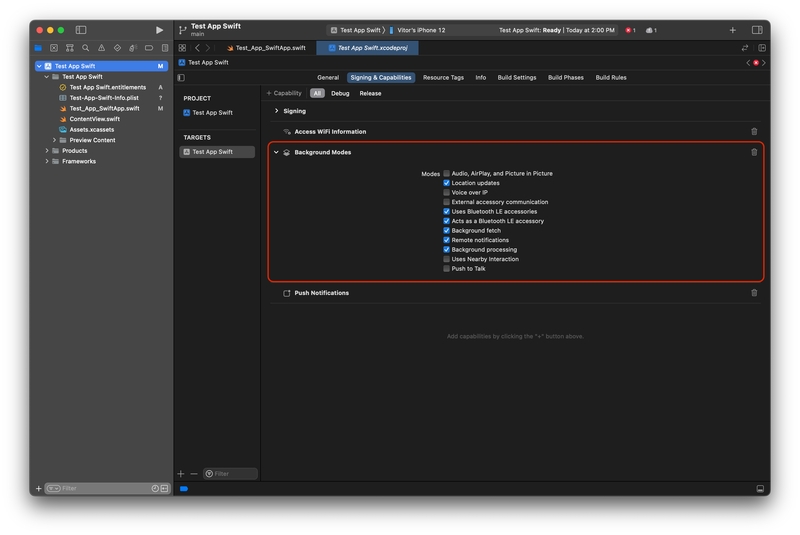
Ativar o modo de background necessário

O suporte a Notificações Push do framework Group Link precisa da permissão de Notificação Remota dentro da entitlement de Modos de Fundo para funcionar corretamente.

Passo 1.3

Passo 2 - Pedir Permissão

Agora, para pedir permissão ao usuário para mostrar notificações, abaixo está o código de como implementar essa função.

Implementação em Swift - Com Badges

let center = UNUserNotificationCenter.current()
func requestNotification() {
center.requestAuthorization(options: [.alert, .sound, .badge]) { granted, error in
if let error = error {
print("Erro ao pedir notificações: \(error)")
}
print("usuário concedeu notificação")
// Habilitar ou desabilitar recursos com base na autorização.
}
}

Implementação em Swift - Sem Badges

let center = UNUserNotificationCenter.current()
func requestNotification() {
center.requestAuthorization(options: [.alert, .sound]) { granted, error in
if let error = error {
print("Erro ao pedir notificações: \(error)")
}
print("usuário concedeu notificação")
// Habilitar ou desabilitar recursos com base na autorização.
}
}

Implementação em Objective-C

- (void)askNotificationPermission {
UNUserNotificationCenter* center = [UNUserNotificationCenter currentNotificationCenter];
[center requestAuthorizationWithOptions:(UNAuthorizationOptionAlert + UNAuthorizationOptionSound)
completionHandler:^(BOOL granted, NSError * _Nullable error) {
// Habilitar ou desabilitar recursos com base na autorização.
}];
[[UIApplication sharedApplication] registerForRemoteNotifications];
}

Chame essa função em qualquer lugar do seu aplicativo. No próximo exemplo, usaremos o início do aplicativo.

Implementação em SwiftUI

@main
struct Group_Link_SettingsApp: App {
init() {
self.requestNotification()
}
var body: some Scene {
WindowGroup {
ContentView()
}
}
}

Implementação em UIKit

class AppDelegate: NSObject, UIApplicationDelegate {
func application(_ application: UIApplication, didFinishLaunchingWithOptions launchOptions: [UIApplication.LaunchOptionsKey : Any]? = nil) -> Bool {
self.requestNotification()
return true
}
}

Implementação em Objective-C

- (BOOL)application:(UIApplication *)application didFinishLaunchingWithOptions:(NSDictionary *)launchOptions {
[self askPermission];
return YES;
}

Passo 3 - Registrar para Notificações Push

Em seguida, você deve implementar o UIApplication.shared.registerForRemoteNotifications() dentro da função didFinishLaunchingWithOptions no seu arquivo AppDelegate. Se você estiver usando SwiftUI para desenvolver, precisará usar o UIApplicationDelegateAdaptor para implementar.

Implementação em Swift

class AppDelegate: NSObject, UIApplicationDelegate {
func application(_ application: UIApplication, didFinishLaunchingWithOptions launchOptions: [UIApplication.LaunchOptionsKey : Any]? = nil) -> Bool {
UIApplication.shared.registerForRemoteNotifications()
return true
}
}
@main
struct Group_Link_SettingsApp: App {
@UIApplicationDelegateAdaptor(AppDelegate.self) var appDelegate
var body: some Scene {
WindowGroup {
ContentView()
}
}
}

Implementação em UIKit

class AppDelegate: NSObject, UIApplicationDelegate {
func application(_ application: UIApplication, didFinishLaunchingWithOptions launchOptions: [UIApplication.LaunchOptionsKey : Any]? = nil) -> Bool {
UIApplication.shared.registerForRemoteNotifications()
return true
}
}

Implementação em Objective-C

- (BOOL)application:(UIApplication *)application didFinishLaunchingWithOptions:(NSDictionary *)launchOptions {
[application registerForRemoteNotifications];
return YES;
}

Passo 4 - Configurando o método didReceive de Notificações do Usuário

Para receber notificações e eventos de clique do nosso painel, você precisa configurar o método didReceive do UNUserNotificationCenterDelegate dentro do seu AppDelegate. Você pode seguir o exemplo abaixo.

Primeiro, você precisa inserir e conformar com o UNUserNotificationCenterDelegate na sua classe AppDelegate.

class AppDelegate: NSObject, UIApplicationDelegate, UNUserNotificationCenterDelegate {
// SEU CÓDIGO DO APP DELEGATE
}

Com o UNUserNotificationCenterDelegate, você pode chamar o método userNotificationCenter didReceive e inserir o GLNotificationDidReceive do nosso SDK, basta passar o center e a response nos parâmetros do método.

func userNotificationCenter(_ center: UNUserNotificationCenter, didReceive response: UNNotificationResponse) async {
GroupLinkSDK.GLNotificationDidReceive(center, didReceive: response)
}

Passo 5 - Obtendo o Token de Notificações Push

Com essas duas implementações, o iOS retornará o token de dispositivo aleatório para o seu aplicativo, que será usado para enviar uma notificação para o dispositivo. Para obter esse token, você precisará implementar outra função do UIApplicationDelegate, o didRegisterForRemoteNotificationsWithDeviceToken caso o usuário aceite a permissão e o didFailToRegisterForRemoteNotificationsWithError caso o usuário negue a permissão.

Se o usuário aceitar a permissão, você chamará a função sendNotificationToken do SDK do Group Link.

Implementação em Swift

func application(_ application: UIApplication,
didRegisterForRemoteNotificationsWithDeviceToken deviceToken: Data) {
let tokenParts = deviceToken.map { data in String(format: "%02.2hhx", data) }
let token = tokenParts.joined()

GroupLinkSDK.sendNotificationToken(token)
}

func application(_ application: UIApplication,
didFailToRegisterForRemoteNotificationsWithError error: Error) {
print("Erro ao obter token de notificação: \(error)")
}

Implementação em Objective-C

- (void)application:(UIApplication *)application didRegisterForRemoteNotificationsWithDeviceToken:(NSData *)deviceToken {
NSUInteger dataLength = deviceToken.length;
if (dataLength == 0) {
return;
}
const unsigned char *dataBuffer = (const unsigned char *)deviceToken.bytes;
NSMutableString *token = [NSMutableString stringWithCapacity:(dataLength * 2)];
for (int i = 0; i < dataLength; ++i) {
[token appendFormat:@"%02x", dataBuffer[i]];
}
[GroupLinkSDK sendNotificationToken:token];
}

- (void)application:(UIApplication *)application didFailToRegisterForRemoteNotificationsWithError:(NSError *)error {
NSLog(@"Erro ao obter token:%@", error);
}

Passo 6 - Configurando a Extensão de Notificações Push

Para receber os KPIs de notificações para o seu aplicativo, você precisará configurar a extensão de notificação no seu app. Para configurar, basta seguir o guia abaixo.

Configurando a Extensão de Serviço de Notificação

Primeiro, você deve criar uma Notification Service Extension, é simples, basta ir à aba Geral do seu arquivo de projeto e, no menu de alvos, clicar no sinal de mais.

Passo 6.1

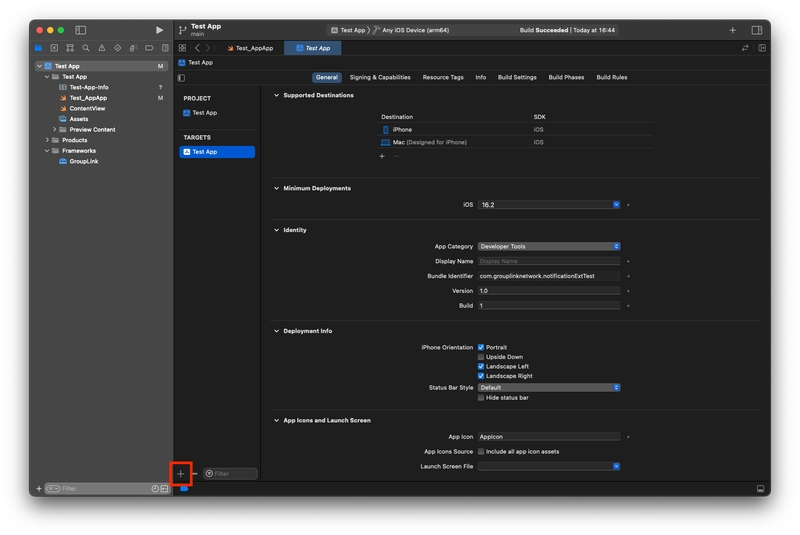
Sinal de mais de Extensões dentro do seu projeto

Após clicar, uma janela aparecerá para selecionar o tipo de extensão que você deseja. A Apple fornecerá uma variedade de extensões para o seu aplicativo, mas você escolherá a Notification Extension Service, essa extensão tem como objetivo implementar notificações ricas, como notificações com imagens, URLs e mais dados.

Passo 6.2

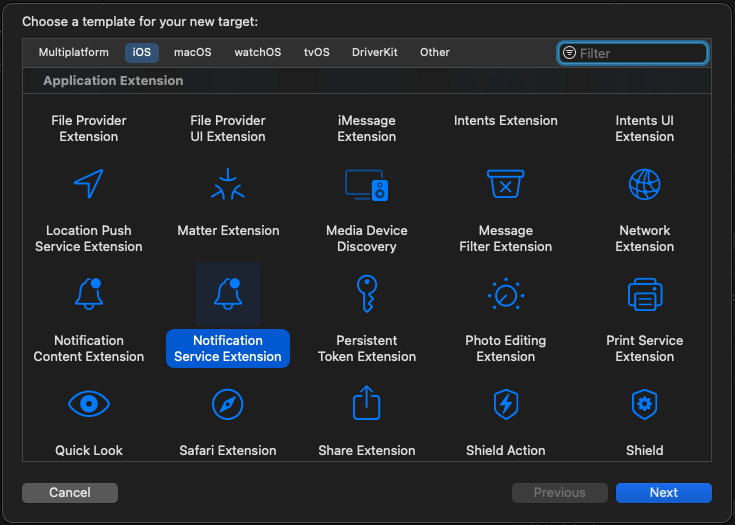
Menu de Extensão de Serviço de Notificação

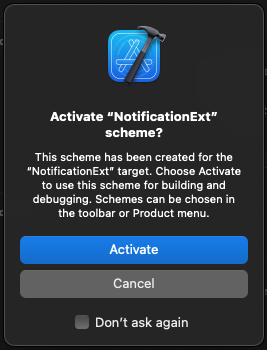
O Xcode perguntará se você deseja depurar a Notification Service Extension em vez do seu aplicativo. Clique em Ativar ou Cancelar para continuar depurando seu aplicativo.

Step 6.2

Tela de Depuração de Extensão

E finalmente, basta importar o framework GroupLinkSDK dentro do arquivo swift da Notification Service e inserir a condição isGroupLinkNotification abaixo da declaração bestAttemptContent, um exemplo de arquivo estará abaixo.

import UserNotifications
import GroupLink

class NotificationService: UNNotificationServiceExtension {

var contentHandler: ((UNNotificationContent) -> Void)?
var bestAttemptContent: UNMutableNotificationContent?

override func didReceive(_ request: UNNotificationRequest, withContentHandler contentHandler: @escaping (UNNotificationContent) -> Void) {
self.contentHandler = contentHandler
bestAttemptContent = (request.content.mutableCopy() as? UNMutableNotificationContent)

if !GroupLinkNotifications.isGroupLinkNotification(request: request, contentHandler: contentHandler, bestAttemptContent: bestAttemptContent) {
if let bestAttemptContent = bestAttemptContent {
bestAttemptContent.title = "\(bestAttemptContent.title) [modificado]"
contentHandler(bestAttemptContent)
}
}
}

override func serviceExtensionTimeWillExpire() {
if let contentHandler = contentHandler, let bestAttemptContent = bestAttemptContent {
contentHandler(bestAttemptContent)
}
}
}

O método isGroupLinkNotification retorna um bool, se retornar false, você pode implementar outro serviço de notificação push, como OneSignal ou Firebase.

Configurando o Método didReceive de Notificação

Para receber o KPI de abertura de notificação, você precisa configurar o método didReceive do UNUserNotificationCenterDelegate dentro do seu aplicativo. É recomendado herdar esse delegado na sua classe AppDelegate. Ao implementar esse método, você pode lidar com as notificações recebidas e rastrear o KPI de abertura de notificação de acordo.

class AppDelegate: NSObject, UIApplicationDelegate, UNUserNotificationCenterDelegate {
func userNotificationCenter(_ center: UNUserNotificationCenter, didReceive response: UNNotificationResponse) async {
GroupLinkNotifications.GLNotificationDidReceive(center, didReceive: response)
}
}

Como mostrado no código acima, o delegado contém o método didReceive para lidar com chamadas de abertura de notificação push. Dentro dessa função, você simplesmente precisa chamar a função GroupLinkNotifications.GLNotificationDidReceive, passando o center e a response como parâmetros. Isso permite que você lide e processe a notificação push recebida de acordo.